
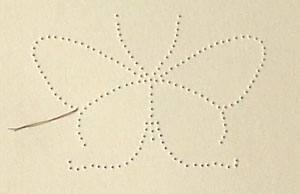
This demonstration uses the free butterfly stitching card pattern. It takes you through the card making prick and stitch paper embroidery process step by step.
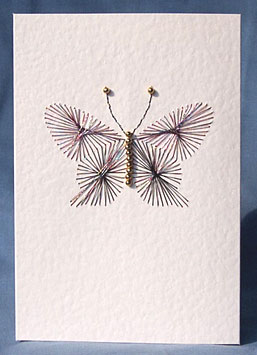
We are using a hammered cream double-fold greetings card 104mm x 152mm (4.2 in x 6 in) and multicolour metallic thread. We recommend the use of metallic thread because it shimmers and glints when it catches the light, creating an elegant look.
You can purchase blank cards in most good paper craft shops or you can make your own from a sheet of card. Metallic thread can be purchased from needlecraft shops or see our Useful Links page.
We recommend the use of a suitable pricking mat. This could be foam or felt but should allow easy penetration of the pricking pin whilst protecting your work surface (a folded tea towel would also work). Lay your blank card onto the pricking mat with the right side (outside) of the card facing upwards.
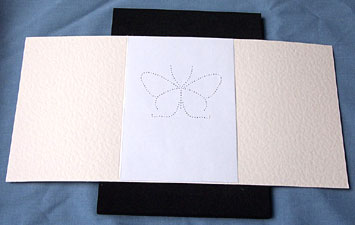
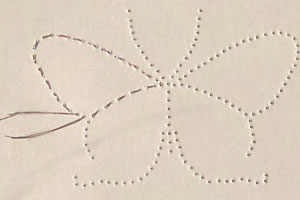
Place the pricking pattern template on the card in the required position.
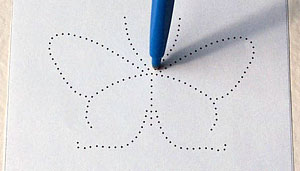
Use a fine pricking tool to prick through the pattern template and the card. The one illustrated is a Parchment Craft Single Needle Perforating Tool made by Pergamano (see our Useful Links page). If you do not have a purpose made pricking tool then a hat pin or similar can be used.
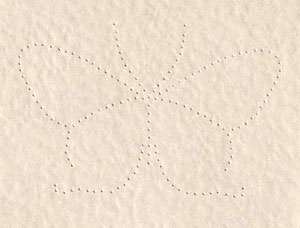
Remove the pricking pattern. The pricked holes can be seen on the card.
Turn the card over so so that it is face down. Select a suitable thread such as metallic cord. Use a Number 10 embroidery needle. Use a length of thread that you are comfortable with. We suggest using about a third of a metre (14 inches). Pass the needle through the start hole from the back to the front of the card. Pull the thread through until there is just a short piece left. Attach this to the back of the card with clear self-adhesive tape.
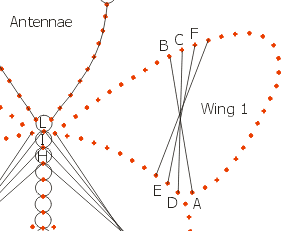
Follow the instruction diagram. In this instance we are coming out of hole A, across the front of the card and in at hole B to the back of the card. Return to the front of the card through hole C. Across the card and in at D. Out at E and in at F. This sets up a sequence of stitching where you are moving along by one hole at a time.

Each stitch moves on by one hole.
The animated diagram on the right shows the stitches advancing.
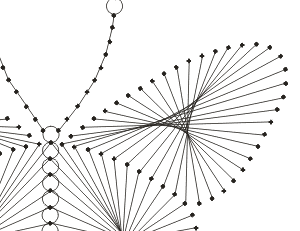
Refer to the finished diagram to see the complete stitching required.
Continue moving forward one hole at a time until the wing section is complete.
Secure the end of the thread on the back of the card with adhesive tape. If the thread on your needle runs out before you have completed a section then secure the end with adhesive tape on the back of the card and start a new thread.
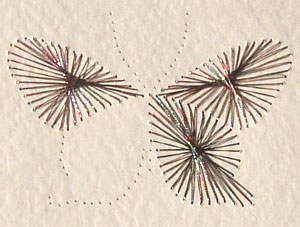
Continue to follow the instructions a section at a time.
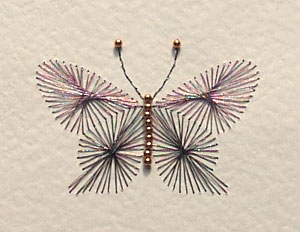
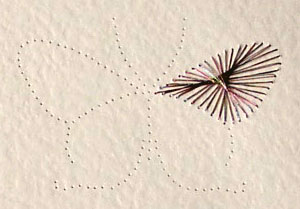
The butterfly pattern uses gold beads for the body and antennae tips. These are held in place with stitching. You may need to use a beading needle if the bead holes are very fine.

This is the back of the finished card. Most of the thread is on the front of the card.
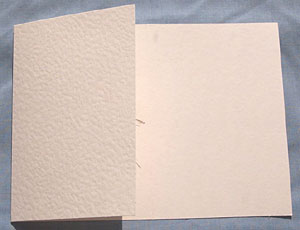
If you are using a double-fold card (a card with three panels) then place it on your work surface with the right side facing downwards. Fold the left-hand panel across to cover and hide the back of the stitching work.
Secure the panel in place with double-sided adhesive tape or card adhesive. The stitching of your paper embroidery card is now complete. You may choose to add a suitable greeting with stickers, stamping or handwriting.
This is the front of the finished card.
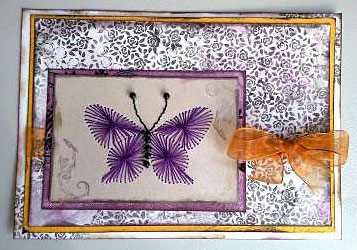
This single-fold butterfly card made by Marathu.
A popular alternative is to stitch the pattern on a rectangle of card and then mount this on the front of a single-fold greetings card. This will hide the stitching on the back. If you choose cards in complimentary colours, or use patterned paper, it will add an extra dimension to your creation.
Postal tip: When posting paper embroidery cards that have beads as an embellishment it is a good idea to include an extra sheet of card to cover the front. This will help protect them when going through automatic mail sorters.
Links to articles about materials and tools

Materials
Card
Thread
Adhesive tape
Tools
Needle
Pricking tool
Pricking mat
Scissors
See our Useful Links page for equipment and materials suppliers.